Know How To Design Your Very Own Fairy Garden
People have been making their own soap for thousands of years. In fact, the very first soap was made in approximately 2800 B.C. by the Babylonians. Today, the art of soapmaking is known to relatively few. Fortunately, it's not too hard for the average person to find instructions for making soap online.
Benefits of Homemade Soap
There's value in learning traditional skills such as how to make soap. If there's ever a shortage of soap or if you want to save money, you can do so by creating your own soap bars. Additionally, if you have sensitive skin or allergies, it's comforting to know exactly what your bar of soap contains. Many commercial soaps have fragrances, preservatives and other ingredients that you may not know about. When you make your own soap, you don't have to worry about questionable ingredients.
If you like fragrances, you can still use natural ingredients to create scented soap bars. A drop or two of your favorite essential oils should do the trick nicely. Just avoid commercial fragrances that may contain a variety of toxic chemical ingredients, such as acetone, ethyl acetate or methylene chloride.
An Important Note About Lye
Though lye is a necessary ingredient in homemade soap, it must be handled carefully. It's a caustic substance that can burn your skin and even create holes in fabric. If you're wondering why in the world such a dangerous ingredient is used when making soap, don't worry! There is no lye remaining in the finished product. It reacts with oils in the soap through a chemical reaction referred to as saponification. As long as you use the right amount of lye when making your soap, it will all be consumed during saponification, so there will be none left in the final product.
When you're handling lye to make your bars, always wear eye protection and gloves. Avoid touching your hair, clothing, face or skin while you're working with lye.
Soapmaking Equipment
Before you begin working on your first bar of soap, you need to gather a few things. Here's the basic soapmaking equipment you'll need to get started:
- Stainless steel, enamel or tempered glass mixing bowl (never use aluminum, plastic or copper)
- Silicone or styrene plastic spoons
- Stainless steel thermometer (select one that reads up to 200? Fahrenheit)
- Newspaper
- Soap molds or silicone baking pans
- An old towel
- A quart and pint canning jar
- Any soap additions you want
Common additives people use in their soaps include essential oils, herbs, natural coloring ingredients and oatmeal.
Easy Homemade Soap Recipe
Now that you have everything you need to make your soap, here's how to make a simple soap recipe that yields approximately five, 3.5 oz. bars.
Ingredients:
- 2/3 cup coconut oil
- 2/3 cup olive oil
- 2/3 cup other type of oil that's liquid at room temperature (such as grapeseed, safflower, sunflower or almond oil)
- 3/4 cup cool water (purified or distilled)
- 1/3 cup lye (100% sodium hydroxide)
Instructions:
- Use newspapers to cover your work area so you can clean up any messes easily.
- Put on your protective gear, including gloves and eyewear.
- Measure your water and pour it into your quart-sized canning jar.
- Measure your lye and slowly pour it into the quart jar with the water while you stir the mixture with a spoon. Fumes will rise up during this process, so don't lean over the jar!
- When the water becomes mostly clear, you can stop stirring and leave the water to rest while you continue on with the recipe.
- Add your three oils together in the pint jar. When combined, they should just fill your jar. Heat the oil mixture in the microwave for approximately one minute, or heat the jar of oils in a pan of water. Once the temperature reaches approximately 120? Fahrenheit, stop heating.
- Wait for both your water/lye mixture and oil mixture to cool to between 95? Fahrenheit and 105? Fahrenheit. You must do this if you want your soap to turn out the right consistency!
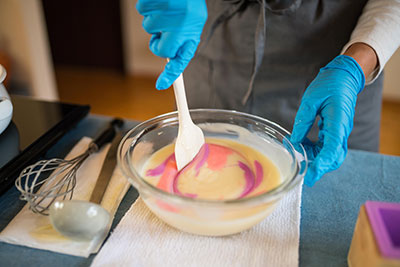
- When the lye and oils reach the correct temperature range, pour the oil mixture into a mixing bowl. Add the lye into the bowl slowly while you stir, until everything's mixed. Keep stirring by hand for at least five minutes. Then, use an immersion blender to continue blending until the mixture is thick and lighter in color (like vanilla pudding).
- Add any essential oils or other additives at this point, stirring well to combine all ingredients. Pour your mixture into your molds and put plastic wrap over the top, then wrap in an old towel to prevent residual heat from escaping. This part of the process is important for triggering saponification.
- Check your soap after 24 hours. If it's still soft and/or warm, leave it alone for another 12-24 hours. You can remove it and put it on a baking rack or parchment paper once it's firm and cool.
- Cut your soap into bars at this point and allow them to cure for approximately four weeks. Turn each bar over once per week to make sure all sides are exposed to air (you can eliminate this step if the soap is on a baking rack).
- Clean your equipment after you're done making soap. To neutralize any lye, you can use white vinegar, then wash the equipment as usual.
To minimize your chances of getting burned by residual lye, wait a few days before washing your equipment. Never use soap-making equipment for food.
Start Making Soap Today!
Ready to start making soap? Try this recipe today.